You can use an image to create a special type of graphics in Photoshop. It's quite simple. Just follow the steps.

Step 1 : Open a new White Layer by going to File>New. I have chosen 1024 x768 pixels when this dialogue box has opened. Always make sure the 'Color Mode' is set to RGB. The other settings can be left unchanged.

Step 2 : The new White Layer has opened.

Step 3 : In the Layers/Channels/Paths pallette at left bottom of Photoshop the White Layer is shown as 'Background'. Notice the lock. It means that this layer cannot be edited. The 'Background' cannot be edited.

Step 4 : Go to File>Open and browse your computer for a suitable image. After this opens drag it to the White Layer. Resize it by dragging the corner handles keeping the ALT pressed on your keyboard. Keeping the ALT pressed keeps the image proportionately while resizing.

Step 5 : The image now covers the white layer completely.

Step 6 : In the Layers/Channels/Paths pallete the image has turned into 'Layer 1'.

Step 7 : Now click on the Horizontal Type Tool from the flyout at left.

Step 8 : At the top left you can set the font you wish to use. A drop down box will appear if you click it. Select the font you want. Leave it at 'Regular' (second box). I have set the points to 300 (third box) because I want large letters. You can set the points by just entering the value in the box. Then there are the three alignments for the text -- left, centre and right. The black color box is the color of your type. (Extreme right)

Step 9 : I have typed in the text. Now drag it to the Centre of the image.

This is the Move Tool in case you did not know. Use it to move the type layer to the centre.

Step 10 : The Type layer is now in another layer. Here it is 'Forest' i.e. the letters I typed.

Step 11 : Now Press CTRL on your keyboard and click on the 'T' where I have shown.

Step 12 : You will immediately see a selection of 'running ants' around the letters.

Step 13 : Now click on 'Layer 1'.

Step 14 : Press CTRL+J on your keyboard and 'Layer 2' will be formed. Notice that the background of this layer is transparent.

Step 15 : Now click off the 'eye' icons of the Type layer and 'Layer 1'.

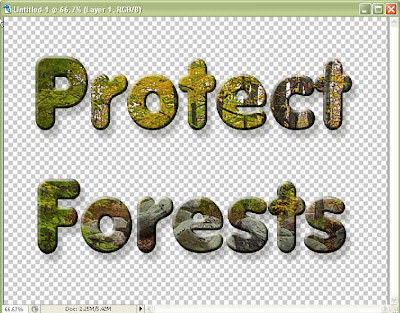
Step 16 : This is the effect you get. You can add a little something to it to make it look even better.

Step 17 : Go to Layer>Layer Style>Drop Shadow as shown above.

Step 18 : When the Layer Style dialogue box opens drag the 'Distance', 'Spred' and 'Size' sliders in that order to the right. Reduce the 'Opacity' to 50 % by dragging the opacity slider to the left. Click ok.

This is what you get. Easy wasn't it?
 Step 1 : Open a New White Layer.
 I have shown how to create the graphics. Now I will show how you can add a background to it.
 Step 1 : I have opened two photos in Photoshop which I intend to blend with 'Blend Options'.


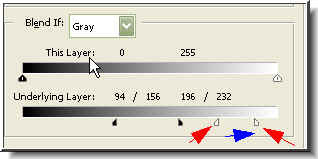
 Step 6 : Note 'This Layer' (highlighted) and 'Underlying Layer' (highlighted) . Also notice the black and white sliders shown by the arrows. We will be using the sliders on the 'Underlying Layer'.
 Step 8 : Now prress ALT on your keyboard and click and drag the Black slider towards the right. The slider will split into two.
 Step 9 : The black slider has been split into two. The second portion has been dragged further to the right.


 Step 1 : This a photo of a Nana Mouskouri album cover which I wish to change into black and white. I have opened it in Photoshop. Choose an image you wish to convert and open it likewise.


 I have opened another photo in Photoshop which I will change into black and white. I will show in more detail how to go about it.
 Step 1 : I have again gone to Image>Calculations.
 Step 3 : Note that the 'Blending is set to Multiply. Click the pop up box and choose soft light.

 Step 6 : This is how the image looks.
 Step 8 : This is how the image looks
 Step 9 : Now change the Channel to Blue
 Step 11 : Now change the Channel to Gray.
