This tutorial is to desaturate a part of the image like in a magazine illustration. Step 1 : I have opened this image in Photoshop.
 Step 2 : Drag the Background to the New Layer icon (the folded bit of paper to duplicate the image).
 Step 3 : The Background has been dupplicated as Background copy.
 Step 4 : Select the Pen Tool from the flyout.
 Step 5 : Click in the middle somewhere in the middle with the pen Tool. Then click at the middle bottom (shown by the blue arrows. As soon as you click at the bottom a vertical line will connect the two points as shown above.
 Step 6 : Again click thePen Tool and click on Add Anchor Point Tool.
 Step 7 : With the Add Anchor Point Tool I have clicked on two points towards the top and botttom (red arrows), It forms two dots on the vertical line. Note that both the points I have clicked have handles (light blue arrows).
 Step 8 : Again click the Pen Tool and from the flyout choose Convert Point Tool.
 Step 9 : With the Convert Point Tool selected drag the handles as shown (red arrows),
 Step 10 : Again click on the Pen Tool to select it.
 Step 11 : With the Pen Tool I have clicked on A, B and C points.
 Step 12 : Again click the Pen Tool and Select Add Anchor Point Tool.
 Step 13 With the Add Anchor Point Tool I have clickd at two points at the right of the image at the top and bottom.
 Step 14 : Again click the Pen Tool and select the Convert Anchor Point Tool.
 Step 15 : With the Convert Anchor Point Tool drag the handles as shown. Notice the bend in the line.
 Step 16 : Again click the Pen Tool.
 Step 17 : Now with the Pen Tool click at the point where I first click. The 'Path' a thin line has now been closed
 Step 18 : In the Layers/Channels/Paths pallete click on Paths (Green arrow). This will open the Paths pallete. You can see the 'Workpath' (yellow arrow) of the selection. Now click on Make Selection (red arrow).
 Step 19 : This dialogue box opens. By default 'New Selection' should be checked. Click ok.
 Step 20 : Notice iimediately after you create ok the path you have created turns into a column of 'marching ants.
 Step 21 : Switch back to Layers by clicking on it (red arrow).
 Step 22 : Press CTRL+J on the keyboard and selection will be copied and pasted onto a new layer. Layer 1 is the new layer with the selection (red arrow).
 Step 23 : Now press CTRL and click on the layer thumbnail as shwon by the red arrow.
 Step 24 : You will now find the selection of 'marching ants reappear.
 Step 25 : Press CTRL+U on the keyboard and the Hue/Saturation dialogue box opens.
 Step 26 : Now drag the Saturation slider all the way to the left. Click ok.
 Step 27 : This is the effect. Press CTRL+D on the keyboard to get rid of the selection.
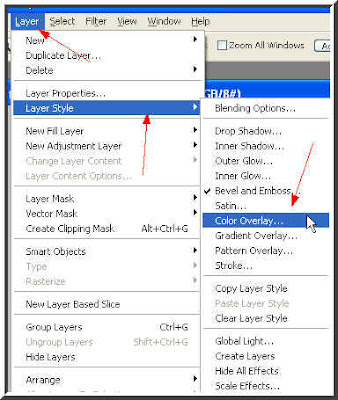
 Step 28 : Go to Layer>Layer Style>Stroke
 Step 29 : The Layer Style Stroke Structure dialogue box opens. Click the red color box shown by the red arrow.
 Step 30 : Click the white on the left where the light blue arrow points to and you will find that the white has been selected as Stroke color (red arrow). Click ok.
 Step 31 : Note the Size in the Stroke Structure. By dragging the slider to the right you an increase the Stroke i.e. you can increase its thickness. I am leaving it unchanged at the default 3 pixel. Click ok.
 Step 32 : And here is the finished effect. Try it out.
Step 1 : I have opened this image in Photoshop.Step 2 : Drag the Background to the New Layer icon (the folded bit of paper to duplicate the image).Step 3 : The Background has been dupplicated as Background copy.Step 4 : Select the Pen Tool from the flyout.Step 5 : Click in the middle somewhere in the middle with the pen Tool. Then click at the middle bottom (shown by the blue arrows. As soon as you click at the bottom a vertical line will connect the two points as shown above.Step 6 : Again click thePen Tool and click on Add Anchor Point Tool.Step 7 : With the Add Anchor Point Tool I have clicked on two points towards the top and botttom (red arrows), It forms two dots on the vertical line. Note that both the points I have clicked have handles (light blue arrows). Step 8 : Again click the Pen Tool and from the flyout choose Convert Point Tool. Step 9 : With the Convert Point Tool selected drag the handles as shown (red arrows), Step 10 : Again click on the Pen Tool to select it. Step 11 : With the Pen Tool I have clicked on A, B and C points. Step 12 : Again click the Pen Tool and Select Add Anchor Point Tool.Step 13 With the Add Anchor Point Tool I have clickd at two points at the right of the image at the top and bottom.Step 15 : With the Convert Anchor Point Tool drag the handles as shown. Notice the bend in the line.Step 16 : Again click the Pen Tool.Step 17 : Now with the Pen Tool click at the point where I first click. The 'Path' a thin line has now been closedStep 18 : In the Layers/Channels/Paths pallete click on Paths (Green arrow). This will open the Paths pallete. You can see the 'Workpath' (yellow arrow) of the selection. Now click on Make Selection (red arrow).Step 19 : This dialogue box opens. By default 'New Selection' should be checked. Click ok.Step 20 : Notice iimediately after you create ok the path you have created turns into a column of 'marching ants.Step 21 : Switch back to Layers by clicking on it (red arrow).Step 22 : Press CTRL+J on the keyboard and selection will be copied and pasted onto a new layer. Layer 1 is the new layer with the selection (red arrow).Step 23 : Now press CTRL and click on the layer thumbnail as shwon by the red arrow.Step 24 : You will now find the selection of 'marching ants reappear.Step 25 : Press CTRL+U on the keyboard and the Hue/Saturation dialogue box opens.Step 26 : Now drag the Saturation slider all the way to the left. Click ok.Step 27 : This is the effect. Press CTRL+D on the keyboard to get rid of the selection.Step 28 : Go to Layer>Layer Style>StrokeStep 29 : The Layer Style Stroke Structure dialogue box opens. Click the red color box shown by the red arrow.Step 30 : Click the white on the left where the light blue arrow points to and you will find that the white has been selected as Stroke color (red arrow). Click ok.Step 31 : Note the Size in the Stroke Structure. By dragging the slider to the right you an increase the Stroke i.e. you can increase its thickness. I am leaving it unchanged at the default 3 pixel. Click ok.Step 32 : And here is the finished effect. Try it out.