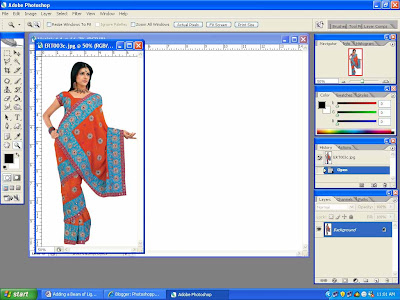
A beam of light can be added artificially with Photoshop. Follow the steps below to do it.
Step 2 I have moved the girl's image to the white layer with the Move Tool.

Step 3 : I have now selected the color for the blank white layer by choosing a color matching the girl's image with the Color Picker.

Step 4 : With the Paint Bucket I have colored the blank white layer. I have chosen a lighter tone to match the color of the sari.

Step 5 : I have used the Burn Tool to darken the bottom of the layer as shown.

Step 6 : I have gone to Layers>Flatten Image as shown. You may skip the above steps and straightaway open a picture where you want to add a light beam.

Step 7 : Now Duplicate the Background Layer by pressing CTRL+J on the keyboard. The Duplicate layer can be seen above. This is the first step if you want to add the light beam directly to an image.

Step 8 : Now use the Polygon Lasso Tool as shown above to draw the beam as above.

Step 9 : Now you have to save your selection as an Alpha Channel. Nothing to worry about. Just click the Alpha Channel Button on the Layers Palette at the bottom right of Photoshop. You will see the Alpha channel created as Alpha 1 as above.

Step 10 : Now click the Alpha 1 channel as shown. You will see the Alpha Channel now as above. Press CTRL+D on the keyboard to deselect the selection.

Step 11 : Now go to Filter>Blur>Gaussian Blur to fade the sharpness of the light beam. It has to have a diffused look.

Step 12 : Now go to Select>Load Selection as shown.

Step 13 : This dialogue will open. Click ok.

Step 14 Now click the RGB channel as shown above.

Step 15 : Go to Select>Inverse as shown above.

Step 16 : Now go to Image>Adjustments>Levels.

Step 17 : When this dialogue open drag the Output Levels Slider to the left as shown. The ray of light will now become visible.

Step 18 : Now again go to Select>inverse. Then go again to Image>Adjustments>Levels and now drag the Output Levels slider to the right.

Step 19 : This is how the light ray now looks. Save. You can play around with the settings . It will vary from image to image. So experimenting is necessary. It will also depend on what other elements you want to edit in the image. Have fun.


0 comments:
Post a Comment