 Step 1 : This is another picure of my colleague Nirmalaya Nag's daughter Brishti taken with a mobile phone camera. This is exceptionally grainy. Let us see what Photoshop CS 2 can do to rectify matters.
Step 2 : The first ting to do is to duplicate the Background. With the left button of the mouse held down drag the Background layer to the Make New Layer Button Layer.

Step 3 : The Background has now been duplicated.

Step 4 : Click off the Background button. I will be working only on the Background copy Layer.

Step 5 : I have gone to Image>Mode>Lab Color

Step 6 : This dialogue box opens. Click Don't Merge.

Step 7 : Go to Layers/Channels/Paths palette and click the Channels. In Channels click Lightness as shown.

Step 8 : The image turns into black and white.

Step 9 : Go to Filters>Sharpen>Unsharp Mask.

Step 10 : The Unsharp Mask Dialogue box opens. I have given the above settings for Amount, Radius and Threshold. This will vary with images. There is nothing hard and fast about it.It has to be seen what works.

Step 11 : Now to change the image back to RGB. Image>Mode>RGB achieves it.

Step 12 : Again this dialogue box pops up. Click don't merge.

Step 13 : This is what the image looks right now.

Step 14 : Go to Filter>Blur>Lens Blur

Step 15 : This dialogue box opens. Click OK. The settings need to be experimented with depending on the requirement of the image.

Step 16 : Go to Filter>Blur>Surface Blur

Step 17 : This dialogue Box opens. Again the settings will have to be set after experiment.

Step 18 : Go to Filter>Blur>Smart Blur

Step 19 : Go to Filter>Sharpen. I have repeated this twice. Note this step may not be necessary at times. It depends on the image.

Step 20 : Now click the Background button. This will also select the layer.

Step 21 : Now go to the Layers/Channels/Paths palette and change the opacity from the drop box to Screen. I have changed it to screen, because Screen works here.

Step 22 : Now go to Image>Adjustments>Levels
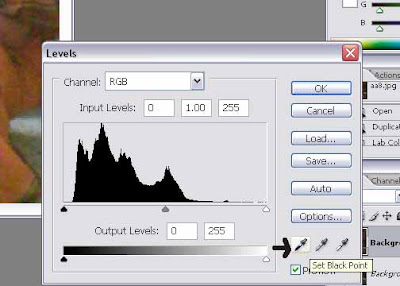
Step 23 : See the arrow. The eyedropper sets the black point. I will show you how to use it.

Step 24 : Click the Set Black Point eye dropper to select it, then click on a dark part of the image. See the red circle. I have clicked there. Now let's see what happens.

Step 25 : Here is the corrected image.
0 comments:
Post a Comment