This is the fifth part of the Text Tutorial. Here The fourth part is here. Here I will show some more text effects.
Step 1 : Type out your text.

Step 2 : In the Layers/Channels/Paths pallete note that the text layer is separate and sits over the 'Background' which is the white layer I have opened.

Step 3 : Go to Layer>Rasterize>Type

Step 4 : Look at the LAyers/Channels/Paths pallete. You will notice that the type now sits in a transparent layer. The text layer has now become editable.

Step 5 : CTRL+click the layer thumbnail of the text layer.

Step 6 : You will notice that the text has been selected by a column of 'marching ants'.

Step 7 : Now select the Gradient Tool.
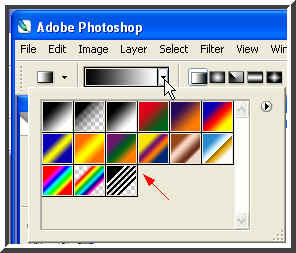
Step 8 : Now click where the white arrow points to in the top panel and the Gradients available will be revealed in a drop down box. Choose any of them by clicking.

Step 9 : The small white hand points to the Gradient I have chosen.

Step 10 : I have dragged down diagonally. It does not matter in which direction you drag. The direction and whether you are dragging from top to bottom is something you can experiment with as it will give a different effect.

Step : 11 And there you have the effect. Press CTRL+D to get rid of the selection of marching ants.

Step 12 : This is an optional step. Go to Layer>Layer Style>Bevel and Emboss.

Step 13 : The Layer Styles Bevel and Emboss structure opens. Click ok.

Step 14 : Now does that not look good?

Step 15 : This has been done with another Gradient and Bevel and Emboss has been added.The possibilities are infinite.

Step 16 : Go to Layer>Layer Style>Drop Shadow.

Step 17 : When the Layer Style Drop Shadow Structure opens you can click ok. You can see the effect.

Step 18 : Or you can give a tweak by moving the Distance, Spread and Size sliders (highlighted in yellow) slightly towards the right and lastly reducing the Opacity (highligted in green) to 50 %. Click ok.

Step 19 : This is the effect. Impressive isn't it? You can even change the color of the Drop Shadow.

Step 20 : In the Layer Style Drop Shadow structure note the small black box the white hand points to. Click it.

Step 21 : When you click the Color Picker opens. Use the cursor to hover over a dark part of the lettering. You will find that the cursor changes to an eye dropper.

Step 22 : Click with the eyedropper tool on a dark shade or any shade for that matter. Here I have clicked on a shade of yellow. See at left. As soon as you click the color on the top right box changes to the same shade, indicating it has been selected. Click ok in the Color Picker.

Step 23 : In the Drop Shadow structure drag the Distance, Spread and Size sliders slightly to the right. You will be able to see the effect as you drag. Reduce the Opacity to 50 % and click ok.

Step 24 : And here is your effect. Nowlet us try another effect.

Step 25 : Here is the text to which I will give the effect. This is a Drop Shadow but with a difference.

Step 26 : Go to Layer>Layer Style>Drop Shadow.
 Step 27 : The Layer Style Drop Shadow Structure opens. Click ok without altering any setting.
Step 27 : This is the effect. The Drop Shadow has been added.

Step 28 : Look at the Layers/Channels/Paths pallette. Note the 'f' icon on the text layer. Right click it. Step 29 : When you right click this pop up appears. Click Create Layer.
Step 29 : When you right click this pop up appears. Click Create Layer.
Step 30 : As soon as you click this dialogue box opens. Just click ok.

Step 31 : Look at the Layers/Channels/Paths pallette. You will find that the Drop Shadow is now in its own layer.

Step 32 : I have now clicked on the shadow layer to select it.

Step 33 : Press CTRL+T on your keyboard and a selection will appear as shown above.

Step 34 : Keping CTRL+T pressed drag up with the Move Tool.

Step 35 : Still keeping CTRL+T pressed used the middle handle to drag it to the right side or any side you wish.
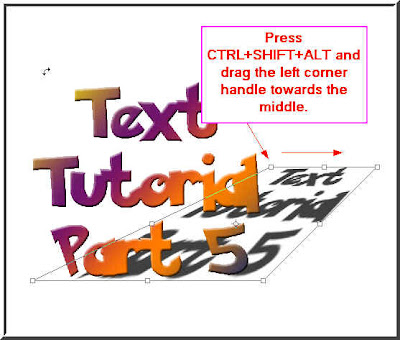 Step 36 : Press CTRL+SHIFT+ALT and drag the left corner handle towards the middle to resize the Drop Shadow.
 Step 37 : Click the Move Tool (red arrow) and this dialogue box pops up. Click Apply (blue arrow).
Step 36 : Press CTRL+SHIFT+ALT and drag the left corner handle towards the middle to resize the Drop Shadow. Step 37 : Click the Move Tool (red arrow) and this dialogue box pops up. Click Apply (blue arrow).
Step 38 : Click on the Add Layer Mask button (white hand) and the layer Mask is formed on the text layer (blue arrow).

Step 39 : Now click on the Rectangular Marquee Tool and draw a selection as shown below.
 Step 40 : Make sure the Foreground color is set to white. If it is not use the small bent arrow beside it to switch between Black and White. Now draw a selection which covers the Drop Shadow of the letters.
Step 40 : Make sure the Foreground color is set to white. If it is not use the small bent arrow beside it to switch between Black and White. Now draw a selection which covers the Drop Shadow of the letters.
Step 41 : Now press CTRL+BACKSPACE on your keyboard. This will fill the selection with white. The Drop Shadow is no longer visible.

Step 42 : Now click the Gradient Tool.

Step 43 : Now with the Gradient Tool drag up diagonally in the direction of the shadow.
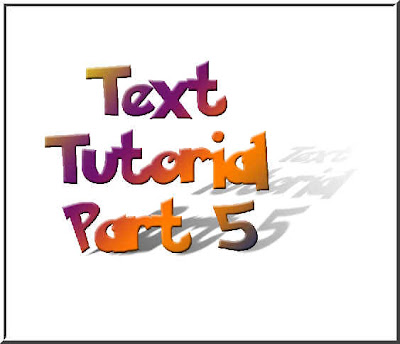
Step 44 : Press CTRL+D on the keyboard to get rid of the selection and there is your effect. There are more effects.
0 comments:
Post a Comment