You can add a wooden frame to any photo for giving a special effect in Photoshop. Here is how it is done.
Step 1 : I have opened this photo in Photoshop to which I will add a wooden frame.

Step 2 : Press CTRL+J on your keyboard. This will form a duplicate layer from the 'Background Layer'. See Layer 1 above. It is the duplicate layer.

Step 3 : Press ALT+CTRL+C on your keyboard and the Canvas Size dialogue box will pop up. Since a woden frame is thick I have changed both the "Width' and 'Height' to 1.5 inchs. Make sure the 'Relative' box (highlighted in the green) is checked. Let the 'Canvas Extension Color' (highlighted in mauve) remain at 'Background'. Click ok.

Step 4 : You can see a white frame has formed around the image.

Step 5 : Now click on the Add New Layer button (shown by the small white hand and blue arrow). You will immediately find a new layer form -- Layer 2 (red arrow).

Step 6 : Go to Edit>Fill.

Step 7 : When the Fill dialogue box opens, select 'Pattern' for 'Use' (highlighted in yellow). Now click on 'Custom Pattern' (red arrow). A dropdown box will appear. Choose the Wood grain (shown by green arrow). Click ok.

Step 8 : In the Fill dialogue box ensure that 'Mode' (highligted in blue) is set to Normal and Opacity (highlighted in mauve) at 100 %. Click ok.

Step 9 : The picture is now hidden and the wood grain covers the entire layer.

Step 10 : Now click back on Layer 1 (red arrow). Next press CTRL on your keyboard and click the layer thumbnail in Layer 1.

Step 11 : As soon as you CTRL+Click a column of 'marching ants' can be seen which is the image hidden behind the wood texture.

Step 12 : Press SHIFT+CTRL+I on your keyboard to invert the selection. You can see the inverted selection above.

Step 13 : Click back on Layer 1 (red arrow). Now click the Add Layer Mask button (shown by the small white hand and green arrow).

Step 14 : Notice that the Layer Mask has formed (green arrow).

Step 15 : You can see the wood frame now. Not quite finished though.

Step 16 : Now click on the Wood grain thumbnail (red arrow). Earlier the Layer mask at its right was selected.

Step 17 : Go to Layer>Layer Style>Bevel and Emboss.

Step 18 : When the Bevel and Embos dialogue box opens, Change the 'Technique' to 'Chisel Hard' from the drop down box. Change the 'Depth' to 150 %. Change the opacity of both 'Highlight Mode' and 'Shadow Mode' to 50 %. Click ok.

Step 19 : This is how the wooden frame now looks.
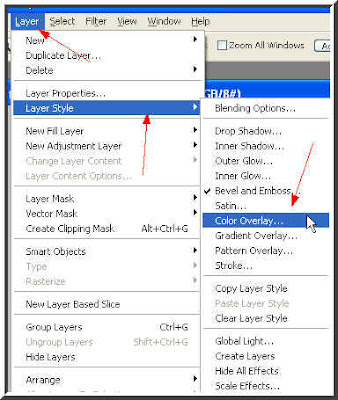
Step 20 : Go to Layer>Layer Style>Color overlay.

Step 21 : When the Color Overlay dialogue box opens, click on red color box. (see red arrow).

Step 22 : When the Color Picker dialogue box opens click near the bottom for a nice dark shade of brown. (see red arrow). Click ok.

Step 23 : This is how the wooden frame now looks.

Step 24 : In the Layer Style dialogue box change the Blend Mode to Color Burn. Click ok.

Step 25 : Go to Layer>Layer Style>Inner Shadow.

Step 26 : When the Inner Shadow dialogue box opens reduce the 'Opacity' to 65 %.

The finished wood frame. How thick you would like your frame to be will depend on your image. You should give the settings accordingly in Step 3. The picture I have used is a large one, therefore the frame looks thin in comparison. OK! That's all!
0 comments:
Post a Comment