You can frame your photos with this Photoshop tutorial. This can be done with any version of Photoshop. Just follow the steps.
Step 1 : I have opened this photo in Photoshop which I will frame. I will use Displacement Maps for this. It is quite easy actually. I will teach you how to do it.

Step 2 : Press CTRL+J to duplicate the image. You will see a duplicate layer (Layer1) form in the Layers/Channels/paths pallette.

Step 3 : Click the New Layer button.

Step 4 : A new Layer forms i.e. Layer 2.

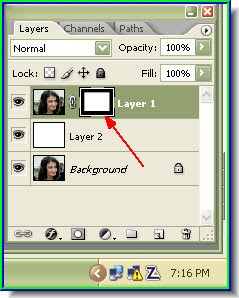
Step 5 : Drag Layer 2 below Layer 1 and above Background.

Step 6 : The Layer 2 has been dragged below Layer 1 and above Background.

Step 7 : Now click the small bent arrow of the Foreground/Background color. Notice that the Foreground is set to Black and Background to White.
 Step 8 : Clicking the small bent arrow changes the Foreground to White and Background to Black.

Step 8 : Clicking the small bent arrow changes the Foreground to White and Background to Black.
Remember we are working on Layer 2. A selected layer is always highlighted.

Step 9 : Go to Edit>Fill.

Step 10 : The Fill dialogue box opens. Make sure 'Use' is set to Foreground Color. Click ok.

Step 11 : The Layer 2 has been filled with White.

Step 12 : Select the Rectangular Marquee Tool by clicking it.

Step 13 : Drag the Rectangular Marquee to mark out a selection which will be the 'frame' of the photo.

Step 14 : The selection has been drawn out with the Rectangular Marquee Tool.

Step 15 : Now click on Layer 1 to select it.

Step 16 : Click the Add Layer Mask button shown.

Step 17 : The Layer Mask has been added beside the Layer thumbnail on Layer 1. Since we had an active selection drawn with the Marquee when the layer mask was added, Photoshop uses the selection to determine which parts of the layer should remain visible and which parts hidden from view. Any areas on the layer that were inside the selection remain visible, while areas outside are hidden

Step 18 : The 'frame' has formed. If you look closely you will see that a white border shows around the edges of the image. The white border is Layer 2, which was filled with white in Step 11.


Step 19 : I have now opened these photos, with which I will be making two Displacement Maps. Follow the same steps for both the images.
Step 20 : Go to Image>Adjustments>Desaturate.

Step 21 : The image has been desaturated.

Step 22 : Go to Image>Adjustments>Levels.

Step 23 : The Levels dialogue opens. Drag the black and white sliders inwards as shown. Click ok.

Step 24 : This is how the image looks.

Step 25 : Go to Filter>Blur Gausian Blur.
 Step 26 : The Gaussian Blur dialogue box opens. Set the radius to 1 pixel or slightly less. I have put 0.9 pixel. Click ok.

Step 26 : The Gaussian Blur dialogue box opens. Set the radius to 1 pixel or slightly less. I have put 0.9 pixel. Click ok.
Step 27 : Go to File>Save As.

Step 28 : Save the desaturated image in psd format. I am saving it in My Pictures. I have named it 'crack'.

Step 29 : I have desaturated the second image too and am saving it as psd naming it bark.
Step 30 : Look at the Layer Mask on layer 1. There is a small white border around it. This indicates that it is selected. If it is not just click the Layer Mask.

Step 31 : Go to Filter>Distort>Displace.

Step 32 : The Displace dialogue box opens. Set the Horizontal and vertical Scales to 20. Make sure Stretch To Fit and Wrap Around are selected. Click ok.

Step 33 : Photoshop will now ask you to choose a Displacement Map. The Choose displacement map dialogue box opens. The 'bark' and 'crack' I had saved as psd files in My Pictures can be seen. I will click bark first.

Step 34 : This is how the image looks. I will again go to Filter>Distort>Displace and choose crack this time.
 Step 35 : This is how the image looks after applying the second Displacement map.

Step 35 : This is how the image looks after applying the second Displacement map.
Step 36 : Now drag Layer 2 to the Trash Can at the bottom.

Step 37 : Now you left with just two layers -- Layer 1 and Background.

Step 38 : The 'frame' is no longer visible.
Step 39 : Click on Background to select it.

Step 40 : Now click the Foreground Color.

Step 41 : The Color Picker dialogue box opens.

Step 42 : The cursor turns into a little eye dropper. Use it to click a color from the image that you like and click ok in the Color Picker.

Step 43 : The Foreground color changes to the color picked by the eyedropper.
 Step 44 : Go to Edit>Fill.

Step 44 : Go to Edit>Fill.
Step 45 : The Fill dialogue box opens. Make sure that Use is set to Foreground Color. Click ok.

Step 46 : The frame is visible again.

Step 47 : Go to Filter>Noise>Add Noise.

Step 48 : The Add Noise dialogue box opens. Drag the Amount slider suitably. Make sure that Gaussian and Monochromatic are selected. Click ok.

Step 49 : Go to Filter>Blur>Motion Blur.

Step 50 : The Motion Blur dialogue box opens. Drag the Distance slider suitably depending on the effect that pleases you. Similarly you can twirl the Angle. Then click ok.

Step 51 : This is how the image looks now.

Step 52 : Now click back on Layer 1 to select it.

Step 53 : Right click the Add Layer Style Button.

Step 54 : From the popup click on Stroke.

Step 54 : The Stroke dialogue box opens. Click the red rectangle in the middle.

Step 55 : Click on the white in the corner. You may also choose any other color from the Spectrum in the middle and a shade from the large box on the left. Click ok on the Color Picker and the Stroke dialogue box.

Here is the finished image. Try it out.
0 comments:
Post a Comment