This is a followup of the Advanced Blending Mode (see here) tutorial in Photoshop.
Step 1 : I have opened this image and written 'Still waters run deep'. I intend to blend the letters with the waters of the pond in the background using the advanced blending technique.

Step 2 : Click the Add a layer style button shown.

Step 3 : From the pop up window click Blending options.

Step 4 : This dialogue box opens.

Step 5 : From the Knockout drop down box choose Deep. (see the black arrow).

Step 6 : From the Blend lf I have chosen Green. The default is Gray. You can choose between Red, Green and Blue. It will depend on how you would like your effects to appear. You have to experiment.

Step 7 : This is the effect I am aiming for. What did I do?

Step 8 : The sliders look like butterfly wings that I have marked with A. To split the butterfly wings press ALT and click. This will split the wings into two halves. The sliders are on both 'This Layer' and 'Underlying Layer'. You should first move the sliders on the 'Underlying Layer'.
There is a Black slider and a White slider on both the layers.
If you move the White button on 'This layer', the letters will disappear. You have to experiment.

Step 9 : I have changed the Blend Mode to Vivid Light. You should experiment with the options as the blend mode will depend on the image and lettering you use.

Step 10 : I have now chosen Stroke from the Add Layer Style button. (The first button with the 'f' on it.)

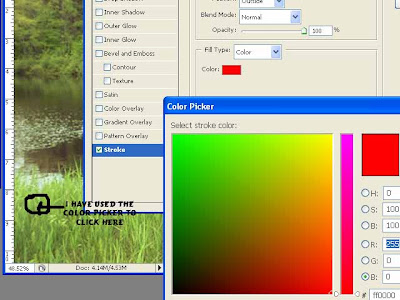
Step 11 : Now click the Color box to change the color of the Stroke. By default it is Red.

Step 12 : When you click the color box the color picker appears. See above.

Step 13 : When you click on a part of the image to choose the Strole color an eyedropper appears. Click with it to select the color from any part of the image. I have marked with the black arrow where I am selecting the color from.

Step 14 : I have changed the 'Position' to Inside. the Size to 3 pixels and Blend Mode to Color Dodge.

Step 15 : Now choose the Bevel and Emboss.

Step 16 : In the Bevel and Emboss dialogue box I have changed certain settings. I have changed the 'Technique' to 'Chisel Hard', I have increased the Depth by moving the slider to the right, I have also increased the Size by moving the slider to the right, I have changed the Gloss Contour to Ring Double. Click on the Gloss Contour to bring up the dropdown box. Also tick the 'Anti alias' check box.

This is the image now. The possibilities of tinkering with the image are infinite. You should experiment. You will be amazed with the results.
So long.
0 comments:
Post a Comment