Sometimes you have photos where the skin tones appears to be dull. Here is a tutorial to fix it and it's easy.

Step 1 : I have opened this image of Aishwarya Rai in Photoshop. The skin color does not look right.

Step 2 : Go to Image>Mode>Lab Color as shown above.

Step 3 : Use SHIFT+CTRL+N to create a New Layer (a shortcut) Name the Layer - Tone, set
Mode to Soft Light. See above. Click OK.
Mode to Soft Light. See above. Click OK.

Step 4 : Go to Image>Apply Image as shown.

Step 5 : In the Apply Image screen, Change the following values:
Layer: Background
Channel: a
Invert: (unchecked)
Blending: Soft Light (See above) Click OK.
Layer: Background
Channel: a
Invert: (unchecked)
Blending: Soft Light (See above) Click OK.
Step 6 : Repeat Step 5, but set the channel to 'b'. Click OK.

Step 7 : This is how the image looks now. Compare it with the one at the beginning of this tutorial.
NOTE: Sometimes tone correcting in this fashion makes an image look very orange or oversaturated. If this is the case with your image, you can select the Tone layer and make some changes with the Hue/Saturation tool (Image >Adjustments> Hue/Saturation )
To give the image more of a pink tone instead of orange, change Hue to -10 or so. At this point, experiment with what you prefer. You can also turn the saturation down to decrease the strength of the Tone layer.
I am decreasing Hue/Saturation to -15. This is how you go about it. See below.

Step 8 : Go to Image>Adjustments>Hue/Saturation.

Step 9 : Select the Background Layer. Then drag the Hue/Saturation slider to left to change the value. See above.

Step 10 : You can see the dramatic change in complexion. But we are not done yet.

Step 11 : Make a selection of the highlights with Ctrl + Alt + Tilde. The Tilde key is the key on your keyboard to the left of the 1 key and above the TAB key.
The highlights are now selected.
The highlights are now selected.
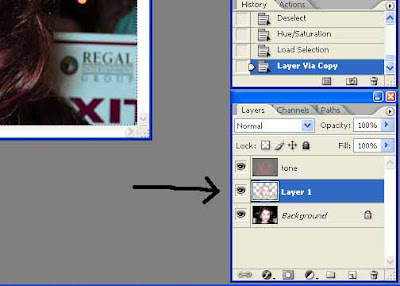
Step 12 : Press CTRL+J on your keyboard to copy the selection. You can see the new layer that has been created (Layer 1).

Step 13 : Change the Opacity to Screen in the Layers/Channels/Paths as shown above.

Step 14 : Decrease opacity to between 20 per cent to 30 per cent.
Save your work. Go to Layers>Flatten Image.
Go to Image>Mode>RGB. Go to File>Save as . Save as Jpg. That's all.
0 comments:
Post a Comment