You can easily create the sun's rays shining underwater for a special effect. This can be done with Gradients and Layers. It can be done in any version of Photoshop. So here we go.
 Step 1 : Open a New White Layer in Photoshop.
In the Layers/Channels/Paths pallete notice that the New White Layer is shown as Background.

Step 2 : Press CTRL+SHIFT+N and the New Layer dialogue box opens. Click ok.

In the Layers/Channels/Paths pallete you will find the New Layer as Layer 1 above the Background.

Step 3 : Click the Foreground Color which is Black by deafult.

The Color Picker opens.
 Step 4 : To change the Foreground Color to a particular shade of Blue enter 1680D1 where the red arrow points to. Click ok. The Foreground Color has been selected.
 The Foreground Color changes to the selected shade of Blue.

Step 4 : To change the Foreground Color to a particular shade of Blue enter 1680D1 where the red arrow points to. Click ok. The Foreground Color has been selected. The Foreground Color changes to the selected shade of Blue.
Step 5 : Now click the Background Color which is White by default.

Step 6 : Now enter 0C1B6C in the box shown by the red arrow. Click ok.

The Foreground Color changes to the shade I picked.

Step 7 : Click the Gradient Tool.

Step 8 : In the top panel click where the red arrow points to.

Step 9 : The Gradient Editor opens. The Gradient chosen is shown by the small white hand. Click ok.

Step 10 : In the top panel click on Linear Gradient shown by the red arrow.

Step 11 : Drag from top to bottom with Gradient Tool.

This is the effect I have got.

Step 12 : Press CTRL+SHIFT+N to make another New Layer. Layer 2 forms in the Layers/Channels/Paths pallete.
 Step 13 : Again click the Foreground Color.

Step 13 : Again click the Foreground Color.
Step 14 : In the Color Picker enter B9DDF9. Click ok.
The Foreground Color has changed to the color I picked.

Step 15 : Again click where the red arrow points to bring up the Gradient Editor.

Step 16 : The Gradient Editor opens. Click on the Gradient shown by the small white hand i.e. the second from top left. Click Ok.

Step 17 : In the top panel click on the Radial Gradient -- the second one shown by the white arrow.

Step 18 : Drag at an angle as shown with the Gradient Tool.
 Step 19 : This is the effect you get.
 Step 20 : CTRL+CLICK on the Layer thumbnail of Layer 2.

Step 19 : This is the effect you get. Step 20 : CTRL+CLICK on the Layer thumbnail of Layer 2.
You will immediately notice a selection form.

Step 21 : Set the Foreground Color to B9DDF9 and Background Color to 0C1B6C as shown earlier.

Step 22 : Go to Filter>Render>Clouds.

Step 23 : Next press CTRL+D to deselect. This is effect I have got.

Step 24 : Go to Filter>Artistic>Plastic Wrap.

Step 25 : When the Plastic Wrap dialogue opens give the settings above.

You will get this effect.

Step 26 : Click on the Move Tool.

Step 27 : You wil immediately notice a selection appear.

Step 28 : Now press CTRL+T. Then with the Move Tool push up the bottom of the selection towards the top as shown.

Step 30 : Click the Move Tool again. This dialogue box opens. Click Apply.

Step 31 : Press CTRL+J on the keyboard and the layer is duplicated as Layer 2 Copy.

Step 32 : Change the Blend Mode. To do this click where the red arrow points to. It will reveal a pop up. From the pop up click on Linear Light.

Step 33 : Now reduce the Opacity to 50%.

This is how the image looks.
 Step 34 : Press CTRL+SHIFT+N to create another new layer i.e. Layer 3.
 Step 35 : Click on the Foreground Color.

Step 34 : Press CTRL+SHIFT+N to create another new layer i.e. Layer 3. Step 35 : Click on the Foreground Color.
Step 36 : Set the Foreground Color to 32F7E7. Click ok.

Step 37 : Now drag down diagonallywith the the Gradient Tool.

This is the effect I have got.

Step 38 : Change the Blend Mode to Overlay and reduce the Opacity to 60%.

This is the effect I have got.

Step 40 : Press CTRL+SHIFT+N to create a New Layer. Layer 4 forms.
 Step 41 : Bring up the Gradient Editor as shown and click on the Gradient as shown by the red arrow. Change the Gradient Type to Noise. Change the Smoothness to 100%. Do not click ok.

Step 41 : Bring up the Gradient Editor as shown and click on the Gradient as shown by the red arrow. Change the Gradient Type to Noise. Change the Smoothness to 100%. Do not click ok.
Step 42 : Now change the Roughness to 100% and tick the Restrict Colors and Add Transparency check boxes. Now click ok.

Step 43 : Click on the Angle gradient shown by the white arrow. The third from the left.

Step 44 : Select the Gradient Tool and drag down diagonally as shown.
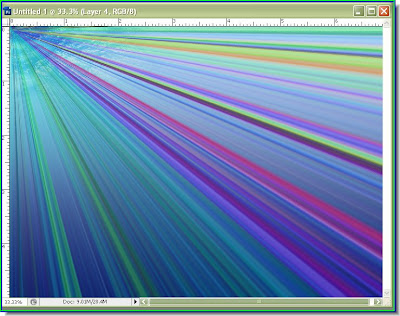
This is the effect you will get.

Step 45 : Now change the Blend Mode to Screen and reduce the Opacity to 20%

This is the finished underwater effect.
0 comments:
Post a Comment