I have been asked to demonstrate something basic -- Changing the background of a photo. It is easily done. 
Step 1 : I have opened this photo in Photoshop.

Step 2 : In the Layers/Channels/Paths palletes you will find the photo as Background. Double click the Background.

Step 3 : When you double click the Background you find the New Layer dialogue box pop up. Click ok.

Step 4 : You wil find that the Background has changed to Layer 0.

Step 5 : Choose the Magnetic Lasso.
 Step 6 : I have begun clicking with the Magnetic Lasso from point A. You can choose from where to begin. You can see that I have reached point B by clicking points with the Magnetic Lasso. If you place a point wrongly, just hit the Delete key on the keyboard, which will remove it then continue as before.

Step 6 : I have begun clicking with the Magnetic Lasso from point A. You can choose from where to begin. You can see that I have reached point B by clicking points with the Magnetic Lasso. If you place a point wrongly, just hit the Delete key on the keyboard, which will remove it then continue as before.
Step 7 : The selection has been completed.

Step 8 : Look in the top panel and set a Feather Radius of 2 pixels. Anti-Alias should be checked.

I have used the Magnetic Lasso here. For very precise cutting the Pen Tool is always preferable. Look here for the tutorial on Pen Tool.

Step 9 : Press CTRL+J. This will copy and paste the selection to a new layer. Look in the Layers/Channels/Paths pallete. You will find a new layer -- Layer 1 -- over Layer 0.
 Step 10 : Now click off the eye icon of Layer 0.
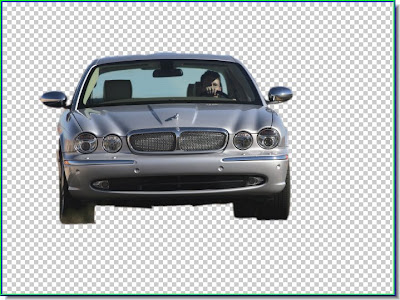 The background has disappeared.
 Step 11 : I have opened this photo of a highway in Photoshop.
 Step 12 : Click the Move Tool to select it.
 Step 13 : Keep SHIFT pressed and drag the car onto the highway. This will ensure that it lands proportionately in the middle.
Step 10 : Now click off the eye icon of Layer 0.The background has disappeared. Step 11 : I have opened this photo of a highway in Photoshop. Step 12 : Click the Move Tool to select it. Step 13 : Keep SHIFT pressed and drag the car onto the highway. This will ensure that it lands proportionately in the middle.
The car on the highway. The background has been changed sucessfully. That is all. Save your work. If you do not know how to save you work Look here.
0 comments:
Post a Comment