Making a cube is not at all difficult. Even beginners can try it. I have tried to make the tutorial as detailed as possible. Go ahead and try it. It's easy.
 Step 1 : Go to File>New.
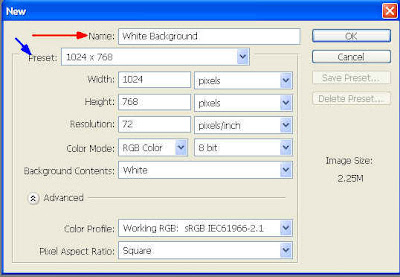
Step 2 : When the 'New' dialogue box opens put the 'Name' as White Background (red arrow). Choose the Preset as 1024 pixels (blue arrow). The 'Background Contents' should be set to white if it is not so. Click ok.

Step 3 : The new white layer has opened.

Step 4 : I will now open a photo from my computer by going to File>Open

Step 5 : The photo I intend to use is in 'My Pictures' folder (red arrow). The picture I intend to use is marked with blue arrow. Click it and click open (green arrow). It will open the image in Photoshop. The photo may also open in Photoshop by just clicking it.

Step 6 : The Photo has opened in Photoshop. The White layer is behind it.

Step 7 : Now select the Move tool (light blue arrow) by clicking it and with your left mouse button pressed and the SHIFT key pressed on your keyboard drag the photo onto the white layer.

Step 8 : The Photo completely covers the white layer now.

Step 9 : Select the Move Tool by clicking it and drag the Photo down on the white layer while keeping the SHIFT key pressed.

Step 10 : Now drag the photo up with the Move Tool.

Step 11 : Drag down.

Step 12 : This is how the Photo looks on the White layer.

Step 13 : Look at the Layers/Channels/Paths pallette on the right bottom of Photoshop. You will find that the white layer is now the 'Background' (red arrow) and the resized photo is 'Layer1'.

Step 14 : Right click the 'Background' and from the popup window select 'Duplicate Layer' (red arrow).

Step 15 : The Duplicate Layer dialogue box opens. Click ok.
 Step 16 : Look at the Layers/Channels/Paths pallette. 'Layer 1 copy' is one that you just made.
Step 17 : Now there are two of these sunsets one above the other. Use the Move Tool to drag one to the left.

Step 18 : Now click off the 'eye' on the Layer 1 copy. It will no longer be visible till you make it visible by clicking back on the eye icon. For the time being it should remain invisible.

Step 19 : Now click Layer 1. Clicking on a layer makes it active i.e. you can work on it. You can work on one layer at a time.

Step 20 : Go to Edit>Transform>Skew

Step 21 : Now with the ALT key pressed on your key board drag down and resize as shown above. Keeping the ALT key press will keep the photo proportionate as you skew.
 Step 22 : Click on the Move Tool or any other tool and this dialogue box will pop up. Click Apply.
Step 23 : Right click layer 1 and the popup box will appear. Select duplicate layer.

Step 24 : This dialogue box pops up click ok.

Step 25 : In the Layers/Channels/Paths pallette a 'Layer 1 copy 2' has been formed.

Step 26 : Go to Edit>Transform>Flip Horizontal

Step 27 : Drag left with the Move Tool.

Step 28 : Now the two layers are perfectly set side by side. They will be the two sides of the cube.

Step 29 : Now click back the eye on Layer 1 copy which has remained hidden. It will become visible again.

Step 30 : The layer has become visible (red arrow).

Step 31 : Move the layer to the top. Note the red arrows. This will be the direction how the image has to be moved. But before you move it there is one more thing to be done.

Step 32 : Go to Edit>Transform>Distort. Then go back to the image.

Step 33 : Look at the red arrows. This is the direction in which you will have to drag the corners of the image to distort it.

Step 34 : This is the completed cube.

Step 35 : In the Layers/Channels/Paths pallette click the Layer 1. Then the 'Add a layer style' buton shown with the red arrow.
 Step 36 : After click the 'Add layer style' buton this popup will appear. Click 'Drop shadow'.
Step 37 : When this dialogue box opens set the values as above or as is suitable for your image. Drag the sliders to change the values. (red arrows).

Step 38 : Now go to Layer 1 copy and give it a drop shadow as in the above steps. Remember you are adding drop shadows to the right and left panels only.

This is the completed cube. Save your work. If you do not know how to do it click here. That is all.
0 comments:
Post a Comment