This will be a tutorial on making a stream of running water in Photoshop, in fact a waterfall where none exists. It can be done in any version of Photoshop. In the course of the tutorial you will be using some built in filters of Photoshop like Plastic Wrap and Chrome and also a Displacement Map. 
Step 1 : Open a new layer by pressing CTRL+N. The New layer dialogue will open. Set the Width and Height at 500 x 500 pixels. Background Contents should be White. Click ok.

Step 2 : Click the New layer button shown by the small white hand and a new layer -- Layer 1 forms in the Layers/Channels/Paths pallette.
 Step 3 : Reset the Foreground/Background color by pressing 'D' on the keyboard.
 Step 4 : Go to Filter>Render Clouds.

Step 3 : Reset the Foreground/Background color by pressing 'D' on the keyboard. Step 4 : Go to Filter>Render Clouds.
This is what you get.

Step 5 : Go to Filter>Blur>Gaussian Blur.

Step 6 : The Gaussian Blur dialogue box opens. Set the Radius at 6.0 pixels. Click ok.

This is how the image looks.
 Step 7 : Go to Filter>Blur>Motion Blur.

Step 7 : Go to Filter>Blur>Motion Blur.
Step 8 : Set the Angle and Distance as shown.

This is how the image looks.

Step 9 : Go to Image>Image Size.

Step 10 : The Image Size dialogue box opens. Change the Width to 300 pixels. Uncheck the Constrain Proportions. Click ok.

This is how the image looks.

Step 11 : Go to Filter>Artistic>Plastic Wrap.
 Step 12 : The Plastic Wrap opens filling up your screen.

Step 12 : The Plastic Wrap opens filling up your screen.
Step 13 : Look at the controls of Plastic Wrap on the top right and set them as shown. Click ok.

This is how the image looks.

Step 14 : Go to Filter>Sketch>Chrome.

Step 15 : The Chrome dialogue box opens.
 Step 16 : Set the Detail and Smoothness with the controls on the top right as shown.

Step 16 : Set the Detail and Smoothness with the controls on the top right as shown.
This is how the image looks.

Step 17 : Go to Edit>Fade Chrome.

Step 18 : Keep the Opacity at 100 % and change the Mode to Hard Light from the drop down window.
This is how the image looks.

Step 19 : Go to Image>Image Size.

Step 20 : In the Image Size dialogue box change the Height to 800 pixels. Make sure Constrain Proportions is unchecked.
This is how the image looks.

Step 21 : Click on the Background to select it. We have been working on Layer 1 so far.

Step 22 : Click the Foreground Color.

Step 23 : The Color Picker opens. Click the blue shown.

Step 24 : Then click a shade of blue from the Spectrum in the middle as shown by clicking. Click ok in the Color Picker.

The Foreground Color has now changed to the one you picked.

Step 25 : Press SHIFT+F5 and the Fill dialogue box opens. Make sure Use is set to Foreground Color. Click ok.

Step 26 : Click on Layer 1 to select it.

Step 27 : Change the Blend Mode to Hard Light.

This is what the image looks like.

Step 28 : Go to Layer>Flatten Image.

Step 29 : The layers have been flattened into a single layer i.e. Background.

I have opened this photo of dry caves in Photoshop.

Step 30 : Use the Move Tool to drag the water image to the cave image keeping SHIFT pressed.

Step 31 : The Move Tool. This is CS 3. You will find the Move Tool in the same place in other versions of Photoshop.

Step 32 : Keeping the SHIFT pressed will make the water image to land exactly in the middle of the cave image.

Make sure that Show Transform Controls is checked in the top panel. In Photoshop 7 it is called Bounding Box and is found in the same place.

Step 33 : Resize the water with the Move Tool. Keeping ALT pressed while resizing helps.

Resized further.

Step 34 : When you are satisfied with the resizing, click any tool on the left panel. This dialogue box appears. Click apply.

Step 34 : Click on the Background layer. Then double click it.

Step 35 : The New layer dialogue box opens when you double click the Background. Click ok without changing any setting.

The background has changed to Layer o.

Step 36 : In the Layers/Channels/Paths pallette click on Channels.

Step 36 : The Channels pallette opens. Click on the Red, Green and Blue channels to see which has the greatest contrast.
Step 37 : Here the Blue channel has the greatest contrast. As soon as you click any of the channels, the picture turns black and white. Drag the Blue channel to the New Channel icon and a Blue copy channel will form.

Step 38 : Click where the small white arrow points to. This is CS 3, in CS2 and Photoshop 7 there is a small black arrow. Click it.

Step 39 : The Duplicate Blue copy channel dialogue box opens. Click where the arrow points to.

Step 40 : From the drop down choose New.

Step 41 : I have named it waterfall. This will be a Displacement Map.

Step 42 : You will notice that a duplicate layer forms.

Step 43 : Press CTRL+L. This will bring up the Levels dialogue box.

Step 44 : Drag the black slider to the right and the image will darken considerably. Click ok.

This is how the duplicate image looks like.

Step 45 : Press CTRL+M. This will bring up the Curves dialogue box. Push the diagonal in the middle up. The image will darken fit urther. Click ok.

This is how the duplicate now looks like.

Step 46 : Press SHIFT+CTRL+S to save the duplicate as a psd file. I have named it waterfall and am saving it in My Pictures. This will be used later as the Displacement Map. After saving close the duplicate image.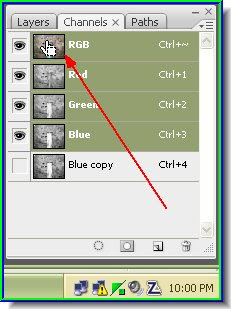
Step 47 : Click on the RGB channel. This will make the color to return to the image.

Step 48 : Click back on the Layers pallette.

Step 49 : The water layer is Layer 1 and the cave layer is layer 0.

Step 50 : Go to Filter>Distort>Displace.

Step 51 : The Displace dialogue box opens. Give the settings as shown above. Click ok.

Step 52 : Photoshop will now ask for the Displacement Map. It has opened My Pictures where I had saved the duplicate image as waterfall. It can be seen. Click it and click Open.

This is how the image looks like.

Step 53 : Click the Add Layer Mask button and a layer mask forms besides the layer thumbnail on Layer 1.

Step 54 : Click the Brush Tool.

Step 55 : Make sure that the Foreground Color is set to Black.

Step 56 : I have zoomed in on the image and am gently brushing away the water to make it seem realistic.
 The water as it looks after working with the brush tool.
 Step 57 : Click the layer thumbnail on the water layer as shown.

The water as it looks after working with the brush tool. Step 57 : Click the layer thumbnail on the water layer as shown.
Step 58 : Go to Image>Adjustments>Hue/Saturation.
Step 59 : The Hue/Saturation dialogue box opens. Check Colorize.

Step 60 : In the Layers/Channels/Paths pallette lower the Opacity of the Water layer.

And here is the waterfall where there was none.
0 comments:
Post a Comment