You can turn any photo into a postage stamp. It is not at all difficult. Any photo will do. But some preparation has to be made.
Step 1 : I have opened a new layer or document of 800 x 600 pixel. Make sure the 'Background Contents' is set to White. Click ok.

Step 2 : In the Layers/Channels/Paths pallette you will see the new white layer as 'Background'.

Step 3 : Click the New Layer button.
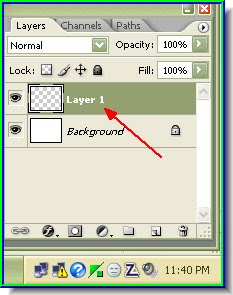
Step 4 : The New Layer has formed above the 'Background'.

Step 5 : Click the Add Layer Mask button.

Step 6 : The Layer Mask has formed next to the New Layer 1 thumbnail.

Step 7 : Click the Brush Tool to activate it.

Step 8 : Press F5 to bring up the Brush Tool Presets at the right top hand corner of Photoshop. If you cannot see the entire preset as shown above click Brush Tip Shape.

I have clicked the Brush Tip Shape.

Next click the Shape Dynamics. You will see this dialogue.

Now again click the Brush Tip Shape.

Step 9 : Now I have set the Diameter of the Brush at 30 pixels. The Roundness to 100 %, tick the Spacing box and set spacing at 120 %. Make sure none of the options such as Shape Dynamics, Scattering etc are selected.

Step 10 : Make sure the Foreground Color is set to black. Press the small black and white square below the large black and white square to set them to the default i.e. Black Foreground and White Background.

Step 11 : Select the Rounded Rectangle Tool.
 Step 12 : On the Top panel check the icon shown. It is Paths.
 Step 13 : Now draw out a selection as shown with the Rounded Rectangular Tool by dragging from the top left hand corner to the right bottom corner.
 Make sure that the Layer Mask is selected. A selected Layer Mask will have double lines around the border if you look closely. If you cannot see it, click the Layer Mask to select it.
 Step 14 : Now we have to open the Paths pallette. Click where the arrow point to in the Layers/Channels/Paths pallette.

Step 12 : On the Top panel check the icon shown. It is Paths. Step 13 : Now draw out a selection as shown with the Rounded Rectangular Tool by dragging from the top left hand corner to the right bottom corner. Make sure that the Layer Mask is selected. A selected Layer Mask will have double lines around the border if you look closely. If you cannot see it, click the Layer Mask to select it. Step 14 : Now we have to open the Paths pallette. Click where the arrow point to in the Layers/Channels/Paths pallette.
Step 15 : The Paths pallete is now revealed.

Step 16 : Right click the Work Path and from the drop down click on 'Stroke Path'.
 Step 17 : The Stroke Path dialogue box opens. Click Brush from the dropdown.

Step 17 : The Stroke Path dialogue box opens. Click Brush from the dropdown.
Step 18 : I have clicked the Brush. Make sure Simulate Pressure is unchecked. Click ok.

Step 19 : Now click the button shown. It is the Load Path as Selection button.
 Step 20 : This will make the selection appear. See above.
 Step 21 : Now click back on the Layers pallete by clicking Layers at the top left.

Step 20 : This will make the selection appear. See above. Step 21 : Now click back on the Layers pallete by clicking Layers at the top left.
Step 22 : When the Layers pallete opens again click on the layer thumbnail as shown. This will deactivate the Layer Mask.

Step 23 : Click on the Foreground Color.
 Step 24 : Clicking on the Foreground Color brings up the Color Picker. Click a color from the Spectrum in the middle. Then select a shade of the color from the large square on the left. I have chosen my color. Click ok.

Step 24 : Clicking on the Foreground Color brings up the Color Picker. Click a color from the Spectrum in the middle. Then select a shade of the color from the large square on the left. I have chosen my color. Click ok.
Step 25 : Notice that the Foreground Color has changed to the color I picked.

Step 26 : Click the Paint Bucket Tool.

Step 27 : Fill the selection as shown with the Paint Bucket. Press CTRL+D to deselect.
 Step 28 : This is the Photo which I will place on the stamp. You can choose any photo.

Step 28 : This is the Photo which I will place on the stamp. You can choose any photo.
Step 29 : Now drag this image onto the stamp with the Move Tool.
 This is the Move Tool
 Step 30 : Since this image is large, it has covered up the stamp layer.
Step 31 : Place the Move tool on the top left of the image and drag down till a corner of the image is visible.

Step 31 : Now Keeping ALT pressed resize the image to fit on the stamp background. Keeping the ALT pressed will resize the image proportionately.
Step 32 : Since you have transformed the image by resizing it, the transformation has to be applied. Click the Move Tool or any other tool and the Apply the Transformation dialogue box opens. Click Apply.

Step 33 : Click the Type Tool and choose the Horizontal Type Tool.

Step 34 : Click on top where the arrow points to reveal a dropdown box showing the fonts available. Choose Impact or Comic Sans or any other font to your liking.

Step 35 : On the top panel set the Font Size by entering value in the box.

Step 36 : Draw a selection with The Text Tool.

Step 37 : I have typed in the text.

Step 38 : Look at the Layers/Channels/Paths Pallete. The Type Layer is the topmost layer i.e. Layer 3. A Type Layer always sits on a layer of its own. Below is Layer 2 or the girl's image, Layer 1 is the stamp and Background is the White layer we began with.

Step 39 : Click the Add a Layer Style Button.

Step 40 : From the dialogue box that pops up select Stroke.

Step 41 : In the Stroke dialogue box, click Color.
 Step 42 : This brings up the Color Picker. Choose the White by clicking on it as shown by the arrow. Click Ok in Color Picker and also the Stroke dialogue box.
Step 43 : Now the stamp is worth something.

Step 44 : Click on the White Background. Click on the Foreground Color which will bring up the Color Picker, choose a darker color and use the Paint Bucket Tool to fill it.

Step 45 : The Background has been filled with color.

Step 46 : Click on the Stamp Layer or Layer 1 to select it. Give a white Stroke to it.

The finished Postage Stamp with Photoshop.
 I forgot to add the name of the country. Here it is. You can go a step further if you wish.

I forgot to add the name of the country. Here it is. You can go a step further if you wish.
Click on the layer containing the girl's image to select it.

Go to Image>Adjustments>Hue & Saturation.

When the Hue & Saturation dialogue box comes up check Colorize.

And there is a mono colored postage stamp. Try it out.
0 comments:
Post a Comment