I have shown how a reflection can be created artificially in Photoshop. See here and here. A reflection in water us slightly different as the water has ripples and moves. The reflection should be realistic therefore. We will also be using a Displacment Map. I will show how it is done.
Step 1 : This is a photo of a pond with railings. We will recreate the railing reflected in the water.


Step 2 : Choose the Selection Tool you prefer -- the Magnetic Lasso or the Pen Tool. I prefer the Pen Tool because of its preciseness.

Step 3 : Use the Zoom Tool to zoom in on the image. You cannot zoom in and use the Magnetic Lasso Tool. If you are using the Magnetic Laso tool you will have to make the selection without zooming in.

Step 4 : I am making the selection with the Pen Tool.

Step 5 : The selection has been completed.

Step 6 : In the Layers/Channels/Paths pallette click on Paths to reveal the Paths pallette (A). Right click the Work Path (B) that appears and a drop down box will open. Click Make Selection (C).

 Step 7 : As soon as you click the Make Selection the Make Selection dialogue box opens. Set a Feather Radius of 1 pixel and make sure New Selection is selected. In the lower image you can see the selection bounded by the 'marching ants'.
Step 7 : As soon as you click the Make Selection the Make Selection dialogue box opens. Set a Feather Radius of 1 pixel and make sure New Selection is selected. In the lower image you can see the selection bounded by the 'marching ants'.
Step 8 : Click back on the Layers in the Layers/Channels/Paths pallette. Then press CTRL+J on the keyboard to copy and paste the selection to a new layer i.e. Layer 1.
 Step 9 : Now go to Edit>Transform>Flip Vertical.

Step 9 : Now go to Edit>Transform>Flip Vertical.
Step 10 : The selection has been flipped vertically.

Step 11 : Now move the selection up.
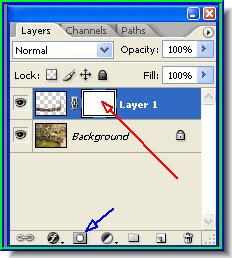
Step 12 : In The Layers/Channels/Paths pallette click the Quick Mask button shown by the blue arrow. The Quick Mask forms beside the layer thumbnail containing the selection on Layer 1.

Step 13 : Now change the Foreground color to White. You can switch between Foreground and Background color by clicking on the small two headed arrow.

Step 14 : Now click on the Rectangular Marquee Tool to select it.

Step 15 : Now draw a selection with the Rectangular Marquee tool so that it covers the entire selection.
 Step 16 : Remember that the Foreground color is set to White. Press CTRL+BACK SPACE on the keyboard. This will fill the selection with white. In effect the selection at the bottom disappears. Compare with the image a step earlier.

Step 16 : Remember that the Foreground color is set to White. Press CTRL+BACK SPACE on the keyboard. This will fill the selection with white. In effect the selection at the bottom disappears. Compare with the image a step earlier.
Step 17 : Click the Gradient Tool and set the Gradient as shown.

Step 18 : With the Gradient selected drag up diagonally as shown.
 Step 19 : The reflection is now visible in the water.


Step 19 : The reflection is now visible in the water.
Step 20 : Change the Foreground color to black and choose the Brush Tool. With the Brush Tool brush away any unwanted portion of the reflection. In my image there are no unwanted portions. But it may crop up in an image you use. Just use the brush tool to brush it away while keeping the Foreground color set at black.


Step 21 : Now click on the Background layer. Next click on the Channels pallette. Drag the Blue Channel to the Create New Channel icon as shown by the red arrow. It will create a Blue copy channel. Next click on the small black arrow on the top right as shown above by the blue arrow.


Step 22 : Click on the Duplicate Channel from the drop down which opens after you click the small black arrow. When you click on the Duplicate Channel, the Duplicate Channel dialogue box opens. From the drop down choose New. Click ok. And, you will find that a Blue copy has formed.
Step 23 : Go to Image>Adjustments>Levels

Step 24 : When the Levels dialogue box opens drag the middle slider slightly to the left to brighten the image.

Step 25 : Now go to Image>Adjustments>Curves

Step 26 : When the Curves dialogue box opens, drag the diagonal in the middle slightly towards the bottom.

Step 27 : Press SHIFT+CTRL+S to save. Save as psd. I an saving it in My Pictures folder.
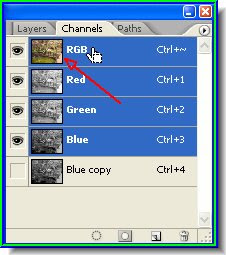
Step 28 : Now click on RGB on the Channels pallette. This will restore color to the image, which had turned black and white.

Step 29 : Now click back on the Layers pallette.

Step 30 : Now click on Layer 1 to select it.
 Step 31 : Go to Filter>Distort>Displace.
 Step 32 : The Displace dialogue box opens. Click ok.
 Step 33 : This dialogue opens asking you to choose a a Displacement Map. (Note I had renamed the psd file to pond as I have other untitled pds files). Click on pond or the displacement map you made.

Step 31 : Go to Filter>Distort>Displace. Step 32 : The Displace dialogue box opens. Click ok. Step 33 : This dialogue opens asking you to choose a a Displacement Map. (Note I had renamed the psd file to pond as I have other untitled pds files). Click on pond or the displacement map you made.
The displacement map fits onto the contour of the image below it. The more contours the image below, the greater the displacement. That is all. Try it out.
0 comments:
Post a Comment